This is a tutorial style post that walks through using the RPython translation
toolchain to create a REPL that executes basic math expressions.
We will do that by scanning the user's input into tokens, compiling those
tokens into bytecode and running that bytecode in our own virtual machine. Don't
worry if that sounds horribly complicated, we are going to explain it step by
step.
This post is a bit of a diversion while on my journey to create a compliant
lox implementation
using the RPython translation toolchain. The
majority of this work is a direct RPython translation of the low level C
guide from Bob Nystrom (@munificentbob) in the
excellent book craftinginterpreters.com
specifically the chapters 14 – 17.
The road ahead
As this post is rather long I'll break it into a few major sections. In each section we will
have something that translates with RPython, and at the end it all comes together.
A REPL
So if you're a Python programmer you might be thinking this is pretty trivial right?
I mean if we ignore input errors, injection attacks etc couldn't we just do something
like this:
"""
A pure python REPL that can parse simple math expressions
"""
while True:
    print(eval(raw_input("> ")))
Well it does appear to do the trick:
$ python2 section-1-repl/main.py
> 3 + 4 * ((1.0/(2 * 3 * 4)) + (1.0/(4 * 5 * 6)) - (1.0/(6 * 7 * 8)))
3.1880952381
So can we just ask RPython to translate this into a binary that runs magically
faster?
Let's see what happens. We need to add two functions for RPython to
get its bearings (entry_point and target) and call the file targetXXX:
targetrepl1.py
def repl():
    while True:
        print eval(raw_input('> '))


def entry_point(argv):
    repl()
    return 0


def target(driver, *args):
    return entry_point, None
Which at translation time gives us this admonishment that accurately tells us
we are trying to call a Python built-in raw_input that is unfortunately not
valid RPython.
$ rpython ./section-1-repl/targetrepl1.py
...SNIP...
[translation:ERROR] AnnotatorError:

object with a __call__ is not RPython: <built-in function raw_input>
Processing block:
 block@18 is a <class 'rpython.flowspace.flowcontext.SpamBlock'>
 in (target1:2)repl
 containing the following operations:
       v0 = simple_call((builtin_function raw_input), ('> '))
       v1 = simple_call((builtin_function eval), v0)
       v2 = str(v1)
       v3 = simple_call((function rpython_print_item), v2)
       v4 = simple_call((function rpython_print_newline))
Ok so we can't use raw_input or eval but that doesn't faze us. Let's get
the input from a stdin stream and just print it out (no evaluation).
targetrepl2.py
from rpython.rlib import rfile

LINE_BUFFER_LENGTH = 1024


def repl(stdin):
    while True:
        print "> ",
        line = stdin.readline(LINE_BUFFER_LENGTH)
        print line


def entry_point(argv):
    stdin, stdout, stderr = rfile.create_stdio()
    try:
        repl(stdin)
    except:
        return 0


def target(driver, *args):
    return entry_point, None
Translate targetrepl2.py – we can add an optimization level if we
are so inclined:
$ rpython --opt=2 section-1-repl/targetrepl2.py
...SNIP...
[Timer] Timings:
[Timer] annotate                       ---  1.2 s
[Timer] rtype_lltype                   ---  0.9 s
[Timer] backendopt_lltype              ---  0.6 s
[Timer] stackcheckinsertion_lltype     ---  0.0 s
[Timer] database_c                     --- 15.0 s
[Timer] source_c                       ---  1.6 s
[Timer] compile_c                      ---  1.9 s
[Timer] =========================================
[Timer] Total:                         --- 21.2 s
No errors!? Let's try it out:
$ ./target2-c
1 + 2
>  1 + 2

^C
Ahh our first success – let's quickly deal with the flushing fail by using the
stdout stream directly as well. Let's print out the input in quotes:
from rpython.rlib import rfile

LINE_BUFFER_LENGTH = 1024


def repl(stdin, stdout):
    while True:
        stdout.write("> ")
        line = stdin.readline(LINE_BUFFER_LENGTH)
        print '"%s"' % line.strip()


def entry_point(argv):
    stdin, stdout, stderr = rfile.create_stdio()
    try:
        repl(stdin, stdout)
    except:
        pass
    return 0


def target(driver, *args):
    return entry_point, None
Translation works, and the test run too:
$ ./target3-c
> hello this seems better
"hello this seems better"
> ^C
So we are in a good place with taking user input and printing output... What about
the whole math evaluation thing we were promised? For that we are can probably leave
our RPython REPL behind for a while and connect it up at the end.
A virtual machine
A virtual machine is the execution engine of our basic math interpreter. It will be very simple,
only able to do simple tasks like addition. I won't go into any depth to describe why we want
a virtual machine, but it is worth noting that many languages including Java and Python make
this decision to compile to an intermediate bytecode representation and then execute that with
a virtual machine. Alternatives are compiling directly to native machine code like (earlier versions of) the V8
JavaScript engine, or at the other end of the spectrum executing an abstract syntax tree –
which is what the Truffle approach to building VMs is based on.
We are going to keep things very simple. We will have a stack where we can push and pop values,
we will only support floats, and our VM will only implement a few very basic operations.
OpCodes
In fact our entire instruction set is:
OP_CONSTANT
OP_RETURN
OP_NEGATE
OP_ADD
OP_SUBTRACT
OP_MULTIPLY
OP_DIVIDE
Since we are targeting RPython we can't use the nice enum module from the Python standard
library, so instead we just define a simple class with class attributes.
We should start to get organized, so we will create a new file
opcodes.py and add this:
class OpCode:
    OP_CONSTANT = 0
    OP_RETURN = 1
    OP_NEGATE = 2
    OP_ADD = 3
    OP_SUBTRACT = 4
    OP_MULTIPLY = 5
    OP_DIVIDE = 6
Chunks
To start with we need to get some infrastructure in place before we write the VM engine.
Following craftinginterpreters.com
we start with a Chunk object which will represent our bytecode. In RPython we have access
to Python-esq lists so our code object will just be a list of OpCode values – which are
just integers. A list of ints, couldn't get much simpler.
section-2-vm/chunk.py
class Chunk:
    code = None

    def __init__(self):
        self.code = []

    def write_chunk(self, byte):
        self.code.append(byte)

    def disassemble(self, name):
        print "== %s ==\n" % name
        i = 0
        while i < len(self.code):
            i = disassemble_instruction(self, i)
From here on I'll only present minimal snippets of code instead of the whole lot, but
I'll link to the repository with the complete example code. For example the
various debugging including disassemble_instruction isn't particularly interesting
to include verbatim. See the github repo for full details
We need to check that we can create a chunk and disassemble it. The quickest way to do this
is to use Python during development and debugging then every so often try to translate it.
Getting the disassemble part through the RPython translator was a hurdle for me as I
quickly found that many str methods such as format are not supported, and only very basic
% based formatting is supported. I ended up creating helper functions for string manipulation
such as:
def leftpad_string(string, width, char=" "):
    l = len(string)
    if l > width:
        return string
    return char * (width - l) + string
Let's write a new entry_point that creates and disassembles a chunk of bytecode. We can
set the target output name to vm1 at the same time:
targetvm1.py
def entry_point(argv):
    bytecode = Chunk()
    bytecode.write_chunk(OpCode.OP_ADD)
    bytecode.write_chunk(OpCode.OP_RETURN)
    bytecode.disassemble("hello world")
    return 0

def target(driver, *args):
    driver.exe_name = "vm1"
    return entry_point, None
Running this isn't going to be terribly interesting, but it is always nice to
know that it is doing what you expect:
$ ./vm1
== hello world ==

0000 OP_ADD
0001 OP_RETURN
Chunks of data
Ref: http://www.craftinginterpreters.com/chunks-of-bytecode.html#constants
So our bytecode is missing a very crucial element – the values to operate on!
As with the bytecode we can store these constant values as part of the chunk
directly in a list. Each chunk will therefore have a constant data component,
and a code component.
Edit the chunk.py file and add the new instance attribute constants as an
empty list, and a new method add_constant.
    def add_constant(self, value):
        self.constants.append(value)
        return len(self.constants) - 1
Now to use this new capability we can modify our example chunk
to write in some constants before the OP_ADD:
    bytecode = Chunk()
    constant = bytecode.add_constant(1.0)
    bytecode.write_chunk(OpCode.OP_CONSTANT)
    bytecode.write_chunk(constant)

    constant = bytecode.add_constant(2.0)
    bytecode.write_chunk(OpCode.OP_CONSTANT)
    bytecode.write_chunk(constant)

    bytecode.write_chunk(OpCode.OP_ADD)
    bytecode.write_chunk(OpCode.OP_RETURN)

    bytecode.disassemble("adding constants")
Which still translates with RPython and when run gives us the following disassembled
bytecode:
== adding constants ==

0000 OP_CONSTANT  (00)        '1'
0002 OP_CONSTANT  (01)        '2'
0004 OP_ADD
0005 OP_RETURN
We won't go down the route of serializing the bytecode to disk, but this bytecode chunk
(including the constant data) could be saved and executed on our VM later – like a Java
.class file. Instead we will pass the bytecode directly to our VM after we've created
it during the compilation process.
Emulation
So those four instructions of bytecode combined with the constant value mapping
00 -> 1.0 and 01 -> 2.0 describes individual steps for our virtual machine
to execute. One major point in favor of defining our own bytecode is we can
design it to be really simple to execute – this makes the VM really easy to implement.
As I mentioned earlier this virtual machine will have a stack, so let's begin with that.
Now the stack is going to be a busy little beast – as our VM takes instructions like
OP_ADD it will pop off the top two values from the stack, and push the result of adding
them together back onto the stack. Although dynamically resizing Python lists
are marvelous, they can be a little slow. RPython can take advantage of a constant sized
list which doesn't make our code much more complicated.
To do this we will define a constant sized list and track the stack_top directly. Note
how we can give the RPython translator hints by adding assertions about the state that
the stack_top will be in.
class VM(object):
    STACK_MAX_SIZE = 256
    stack = None
    stack_top = 0

    def __init__(self):
        self._reset_stack()

    def _reset_stack(self):
        self.stack = [0] * self.STACK_MAX_SIZE
        self.stack_top = 0

    def _stack_push(self, value):
        assert self.stack_top < self.STACK_MAX_SIZE
        self.stack[self.stack_top] = value
        self.stack_top += 1

    def _stack_pop(self):
        assert self.stack_top >= 0
        self.stack_top -= 1
        return self.stack[self.stack_top]

    def _print_stack(self):
        print "         ",
        if self.stack_top <= 0:
            print "[]",
        else:
            for i in range(self.stack_top):
                print "[ %s ]" % self.stack[i],
        print
Now we get to the main event, the hot loop, the VM engine. Hope I haven't built it up to
much, it is actually really simple! We loop until the instructions tell us to stop
(OP_RETURN), and dispatch to other simple methods based on the instruction.
    def _run(self):
        while True:
            instruction = self._read_byte()

            if instruction == OpCode.OP_RETURN:
                print "%s" % self._stack_pop()
                return InterpretResultCode.INTERPRET_OK
            elif instruction == OpCode.OP_CONSTANT:
                constant = self._read_constant()
                self._stack_push(constant)
            elif instruction == OpCode.OP_ADD:
                self._binary_op(self._stack_add)
Now the _read_byte method will have to keep track of which instruction we are up
to. So add an instruction pointer (ip) to the VM with an initial value of 0.
Then _read_byte is simply getting the next bytecode (int) from the chunk's code:
    def _read_byte(self):
        instruction = self.chunk.code[self.ip]
        self.ip += 1
        return instruction
If the instruction is OP_CONSTANT we take the constant's address from the next byte
of the chunk's code, retrieve that constant value and add it to the VM's stack.
    def _read_constant(self):
        constant_index = self._read_byte()
        return self.chunk.constants[constant_index]
Finally our first arithmetic operation OP_ADD, what it has to achieve doesn't
require much explanation: pop two values from the stack, add them together, push
the result. But since a few operations all have the same template we introduce a
layer of indirection – or abstraction – by introducing a reusable _binary_op
helper method.
    @specialize.arg(1)
    def _binary_op(self, operator):
        op2 = self._stack_pop()
        op1 = self._stack_pop()
        result = operator(op1, op2)
        self._stack_push(result)

    @staticmethod
    def _stack_add(op1, op2):
        return op1 + op2
Note we tell RPython to specialize _binary_op on the first argument. This causes
RPython to make a copy of _binary_op for every value of the first argument passed,
which means that each copy contains a call to a particular operator, which can then be
inlined.
To be able to run our bytecode the only thing left to do is to pass in the chunk
and call _run():
    def interpret_chunk(self, chunk):
        if self.debug_trace:
            print "== VM TRACE =="
        self.chunk = chunk
        self.ip = 0
        try:
            result = self._run()
            return result
        except:
            return InterpretResultCode.INTERPRET_RUNTIME_ERROR
targetvm3.py connects the pieces:
def entry_point(argv):
    bytecode = Chunk()
    constant = bytecode.add_constant(1)
    bytecode.write_chunk(OpCode.OP_CONSTANT)
    bytecode.write_chunk(constant)
    constant = bytecode.add_constant(2)
    bytecode.write_chunk(OpCode.OP_CONSTANT)
    bytecode.write_chunk(constant)
    bytecode.write_chunk(OpCode.OP_ADD)
    bytecode.write_chunk(OpCode.OP_RETURN)

    vm = VM()
    vm.interpret_chunk(bytecode)

    return 0
I've added some trace debugging so we can see what the VM and stack is doing.
The whole thing translates with RPython, and when run gives us:
./vm3
== VM TRACE ==
          []
0000 OP_CONSTANT  (00)        '1'
          [ 1 ]
0002 OP_CONSTANT  (01)        '2'
          [ 1 ] [ 2 ]
0004 OP_ADD
          [ 3 ]
0005 OP_RETURN
3
Yes we just computed the result of 1+2. Pat yourself on the back.
At this point it is probably valid to check that the translated executable is actually
faster than running our program directly in Python. For this trivial example under
Python2/pypy this targetvm3.py file runs in the 20ms – 90ms region, and the
compiled vm3 runs in <5ms. Something useful must be happening during the translation.
I won't go through the code adding support for our other instructions as they are
very similar and straightforward. Our VM is ready to execute our chunks of bytecode,
but we haven't yet worked out how to take the entered expression and turn that into
this simple bytecode. This is broken into two steps, scanning and compiling.
Scanning the source
All the source for this section can be found in
section-3-scanning.
The job of the scanner is to take the raw expression string and transform it into
a sequence of tokens. This scanning step will strip out whitespace and comments,
catch errors with invalid token and tokenize the string. For example the input
"( 1 + 2 ) would get tokenized into LEFT_PAREN, NUMBER(1), PLUS, NUMBER(2), RIGHT_PAREN.
As with our OpCodes we will just define a simple Python class to define an int
for each type of token:
class TokenTypes:
    ERROR = 0
    EOF = 1
    LEFT_PAREN = 2
    RIGHT_PAREN = 3
    MINUS = 4
    PLUS = 5
    SLASH = 6
    STAR = 7
    NUMBER = 8
A token has to keep some other information as well – keeping track of the location and
length of the token will be helpful for error reporting. The NUMBER token clearly needs
some data about the value it is representing: we could include a copy of the source lexeme
(e.g. the string 2.0), or parse the value and store that, or – what we will do in this
blog – use the location and length information as pointers into the original source
string. Every token type (except perhaps ERROR) will use this simple data structure:
class Token(object):

    def __init__(self, start, length, token_type):
        self.start = start
        self.length = length
        self.type = token_type
Our soon to be created scanner will create these Token objects which refer back to
addresses in some source. If the scanner sees the source "( 1 + 2.0 )" it would emit
the following tokens:
Token(0, 1, TokenTypes.LEFT_PAREN)
Token(2, 1, TokenTypes.NUMBER)
Token(4, 1, TokenTypes.PLUS)
Token(6, 3, TokenTypes.NUMBER)
Token(10, 1, TokenTypes.RIGHT_PAREN)
Scanner
Let's walk through the scanner implementation method
by method. The scanner will take the source and pass through it once, creating tokens
as it goes.
class Scanner(object):

    def __init__(self, source):
        self.source = source
        self.start = 0
        self.current = 0
The start and current variables are character indices in the source string that point to
the current substring being considered as a token.
For example in the string "(51.05+2)" while we are tokenizing the number 51.05
we will have start pointing at the 5, and advance current character by character
until the character is no longer part of a number. Midway through scanning the number
the start and current values might point to 1 and 4 respectively:
| 0 |
1 |
2 |
3 |
4 |
5 |
6 |
7 |
8 |
| "(" |
"5" |
"1" |
"." |
"0" |
"5" |
"+" |
"2" |
")" |
|
^ |
|
|
^ |
|
|
|
|
From current=4 the scanner peeks ahead and sees that the next character (5) is
a digit, so will continue to advance.
| 0 |
1 |
2 |
3 |
4 |
5 |
6 |
7 |
8 |
| "(" |
"5" |
"1" |
"." |
"0" |
"5" |
"+" |
"2" |
")" |
|
^ |
|
|
|
^ |
|
|
|
When the scanner peeks ahead and sees the "+" it will create the number
token and emit it. The method that carry's out this tokenizing is _number:
    def _number(self):
        while self._peek().isdigit():
            self.advance()

        # Look for decimal point
        if self._peek() == '.' and self._peek_next().isdigit():
            self.advance()
            while self._peek().isdigit():
                self.advance()

        return self._make_token(TokenTypes.NUMBER)
It relies on a few helpers to look ahead at the upcoming characters:
    def _peek(self):
        if self._is_at_end():
            return '\0'
        return self.source[self.current]

    def _peek_next(self):
        if self._is_at_end():
            return '\0'
        return self.source[self.current+1]

    def _is_at_end(self):
        return len(self.source) == self.current
If the character at current is still part of the number we want to call advance
to move on by one character.
    def advance(self):
        self.current += 1
        return self.source[self.current - 1]
Once the isdigit() check fails in _number() we call _make_token() to emit the
token with the NUMBER type.
    def _make_token(self, token_type):
        return Token(
            start=self.start,
            length=(self.current - self.start),
            token_type=token_type
        )
Note again that the token is linked to an index address in the source, rather than
including the string value.
Our scanner is pull based, a token will be requested via scan_token. First we skip
past whitespace and depending on the characters emit the correct token:
    def scan_token(self):
        # skip any whitespace
        while True:
            char = self._peek()
            if char in ' \r\t\n':
                self.advance()
            break

        self.start = self.current

        if self._is_at_end():
            return self._make_token(TokenTypes.EOF)

        char = self.advance()

        if char.isdigit():
            return self._number()

        if char == '(':
            return self._make_token(TokenTypes.LEFT_PAREN)
        if char == ')':
            return self._make_token(TokenTypes.RIGHT_PAREN)
        if char == '-':
            return self._make_token(TokenTypes.MINUS)
        if char == '+':
            return self._make_token(TokenTypes.PLUS)
        if char == '/':
            return self._make_token(TokenTypes.SLASH)
        if char == '*':
            return self._make_token(TokenTypes.STAR)

        return ErrorToken("Unexpected character", self.current)
If this was a real programming language we were scanning, this would be the point where we
add support for different types of literals and any language identifiers/reserved words.
At some point we will need to parse the literal value for our numbers, but we leave that
job for some later component, for now we'll just add a get_token_string helper. To make
sure that RPython is happy to index arbitrary slices of source we add range assertions:
    def get_token_string(self, token):
        if isinstance(token, ErrorToken):
            return token.message
        else:
            end_loc = token.start + token.length
            assert end_loc < len(self.source)
            assert end_loc > 0
            return self.source[token.start:end_loc]
A simple entry point can be used to test our scanner with a hard coded
source string:
targetscanner1.py
from scanner import Scanner, TokenTypes, TokenTypeToName


def entry_point(argv):

    source = "(   1   + 2.0 )"

    scanner = Scanner(source)
    t = scanner.scan_token()
    while t.type != TokenTypes.EOF and t.type != TokenTypes.ERROR:
        print TokenTypeToName[t.type],
        if t.type == TokenTypes.NUMBER:
            print "(%s)" % scanner.get_token_string(t),
        print
        t = scanner.scan_token()
    return 0
RPython didn't complain, and lo it works:
$ ./scanner1
LEFT_PAREN
NUMBER (1)
PLUS
NUMBER (2.0)
RIGHT_PAREN
Let's connect our REPL to the scanner.
targetscanner2.py
from rpython.rlib import rfile
from scanner import Scanner, TokenTypes, TokenTypeToName

LINE_BUFFER_LENGTH = 1024


def repl(stdin, stdout):
    while True:
        stdout.write("> ")
        source = stdin.readline(LINE_BUFFER_LENGTH)

        scanner = Scanner(source)
        t = scanner.scan_token()
        while t.type != TokenTypes.EOF and t.type != TokenTypes.ERROR:
            print TokenTypeToName[t.type],
            if t.type == TokenTypes.NUMBER:
                print "(%s)" % scanner.get_token_string(t),
            print
            t = scanner.scan_token()


def entry_point(argv):
    stdin, stdout, stderr = rfile.create_stdio()
    try:
        repl(stdin, stdout)
    except:
        pass
    return 0
With our REPL hooked up we can now scan tokens from arbitrary input:
$ ./scanner2
> (3 *4) - -3
LEFT_PAREN
NUMBER (3)
STAR
NUMBER (4)
RIGHT_PAREN
MINUS
MINUS
NUMBER (3)
> ^C
Compiling expressions
References
- https://www.craftinginterpreters.com/compiling-expressions.html
- http://effbot.org/zone/simple-top-down-parsing.htm
The final piece is to turn this sequence of tokens into our low level
bytecode instructions for the virtual machine to execute. Buckle up,
we are about to write us a compiler.
Our compiler will take a single pass over the tokens using
Vaughan Pratt’s
parsing technique, and output a chunk of bytecode – if we do it
right it will be compatible with our existing virtual machine.
Remember the bytecode we defined above is really simple – by relying
on our stack we can transform a nested expression into a sequence of
our bytecode operations.
To make this more concrete let's go through by hand translating an
expression into bytecode.
Our source expression:
(3 + 2) - (7 * 2)
If we were to make an abstract syntax tree we'd get something
like this:
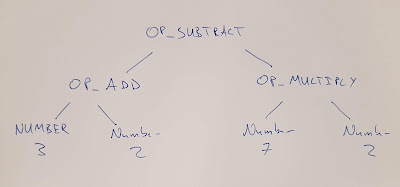
Now if we start at the first sub expression (3+2) we can clearly
note from the first open bracket that we must see a close bracket,
and that the expression inside that bracket must be valid on its
own. Not only that but regardless of the inside we know that the whole
expression still has to be valid. Let's focus on this first bracketed
expression, let our attention recurse into it so to speak.
This gives us a much easier problem – we just want to get our virtual
machine to compute 3 + 2. In this bytecode dialect we would load the
two constants, and then add them with OP_ADD like so:
OP_CONSTANT  (00) '3.000000'
OP_CONSTANT  (01) '2.000000'
OP_ADD
The effect of our vm executing these three instructions is that sitting
pretty at the top of the stack is the result of the addition. Winning.
Jumping back out from our bracketed expression, our next token is MINUS,
at this point we have a fair idea that it must be used in an infix position.
In fact whatever token followed the bracketed expression it must be a
valid infix operator, if not the expression is over or had a syntax error.
Assuming the best from our user (naive), we handle MINUS the same way
we handled the first PLUS. We've already got the first operand on the
stack, now we compile the right operand and then write out the bytecode
for OP_SUBTRACT.
The right operand is another simple three instructions:
OP_CONSTANT  (02) '7.000000'
OP_CONSTANT  (03) '2.000000'
OP_MULTIPLY
Then we finish our top level binary expression and write a OP_RETURN to
return the value at the top of the stack as the execution's result. Our
final hand compiled program is:
OP_CONSTANT  (00) '3.000000'
OP_CONSTANT  (01) '2.000000'
OP_ADD
OP_CONSTANT  (02) '7.000000'
OP_CONSTANT  (03) '2.000000'
OP_MULTIPLY
OP_SUBTRACT
OP_RETURN
Ok that wasn't so hard was it? Let's try make our code do that.
We define a parser object which will keep track of where we are, and
whether things have all gone horribly wrong:
class Parser(object):
    def __init__(self):
        self.had_error = False
        self.panic_mode = False
        self.current = None
        self.previous = None
The compiler will also be a class, we'll need one of our Scanner instances
to pull tokens from, and since the output is a bytecode Chunk let's go ahead
and make one of those in our compiler initializer:
class Compiler(object):

    def __init__(self, source):
        self.parser = Parser()
        self.scanner = Scanner(source)
        self.chunk = Chunk()
Since we have this (empty) chunk of bytecode we will make a helper method
to add individual bytes. Every instruction will pass from our compiler into
an executable program through this simple .
    def emit_byte(self, byte):
        self.current_chunk().write_chunk(byte)
To quote from Bob Nystrom on the Pratt parsing technique:
the implementation is a deceptively-simple handful of deeply intertwined code
I don't actually think I can do justice to this section. Instead I suggest
reading his treatment in
Pratt Parsers: Expression Parsing Made Easy
which explains the magic behind the parsing component. Our only major difference is
instead of creating an AST we are going to directly emit bytecode for our VM.
Now that I've absolved myself from taking responsibility in explaining this somewhat
tricky concept, I'll discuss some of the code from
compiler.py, and walk through what happens
for a particular rule.
I'll jump straight to the juicy bit the table of parse rules. We define a ParseRule
for each token, and each rule comprises:
- an optional handler for when the token is as a prefix (e.g. the minus in
(-2)),
- an optional handler for whet the token is used infix (e.g. the slash in
2/47)
- a precedence value (a number that determines what is of higher precedence)
rules = [
    ParseRule(None,              None,            Precedence.NONE),   # ERROR
    ParseRule(None,              None,            Precedence.NONE),   # EOF
    ParseRule(Compiler.grouping, None,            Precedence.CALL),   # LEFT_PAREN
    ParseRule(None,              None,            Precedence.NONE),   # RIGHT_PAREN
    ParseRule(Compiler.unary,    Compiler.binary, Precedence.TERM),   # MINUS
    ParseRule(None,              Compiler.binary, Precedence.TERM),   # PLUS
    ParseRule(None,              Compiler.binary, Precedence.FACTOR), # SLASH
    ParseRule(None,              Compiler.binary, Precedence.FACTOR), # STAR
    ParseRule(Compiler.number,   None,            Precedence.NONE),   # NUMBER
]
These rules really are the magic of our compiler. When we get to a particular
token such as MINUS we see if it is an infix operator and if so we've gone and
got its first operand ready. At all times we rely on the relative precedence; consuming
everything with higher precedence than the operator we are currently evaluating.
In the expression:
2 + 3 * 4
The * has higher precedence than the +, so 3 * 4 will be parsed together
as the second operand to the first infix operator (the +) which follows
the BEDMAS
order of operations I was taught at high school.
To encode these precedence values we make another Python object moonlighting
as an enum:
class Precedence(object):
    NONE = 0
    DEFAULT = 1
    TERM = 2        # + -
    FACTOR = 3      # * /
    UNARY = 4       # ! - +
    CALL = 5        # ()
    PRIMARY = 6
What happens in our compiler when turning -2.0 into bytecode? Assume we've just
pulled the token MINUS from the scanner. Every expression has to start with some
type of prefix – whether that is:
- a bracket group
(,
- a number
2,
- or a prefix unary operator
-.
Knowing that, our compiler assumes there is a prefix handler in the rule table – in
this case it points us at the unary handler.
    def parse_precedence(self, precedence):
        # parses any expression of a given precedence level or higher
        self.advance()
        prefix_rule = self._get_rule(self.parser.previous.type).prefix
        prefix_rule(self)
unary is called:
    def unary(self):
        op_type = self.parser.previous.type
        # Compile the operand
        self.parse_precedence(Precedence.UNARY)
        # Emit the operator instruction
        if op_type == TokenTypes.MINUS:
            self.emit_byte(OpCode.OP_NEGATE)
Here – before writing the OP_NEGATE opcode we recurse back into parse_precedence
to ensure that whatever follows the MINUS token is compiled – provided it has
higher precedence than unary – e.g. a bracketed group.
Crucially at run time this recursive call will ensure that the result is left
on top of our stack. Armed with this knowledge, the unary method just
has to emit a single byte with the OP_NEGATE opcode.
Test compilation
Now we can test our compiler by outputting disassembled bytecode
of our user entered expressions. Create a new entry_point
targetcompiler:
from rpython.rlib import rfile
from compiler import Compiler

LINE_BUFFER_LENGTH = 1024


def entry_point(argv):
    stdin, stdout, stderr = rfile.create_stdio()

    try:
        while True:
            stdout.write("> ")
            source = stdin.readline(LINE_BUFFER_LENGTH)
            compiler = Compiler(source, debugging=True)
            compiler.compile()
    except:
        pass
    return 0
Translate it and test it out:
$ ./compiler1
> (2/4 + 1/2)
== code ==

0000 OP_CONSTANT  (00) '2.000000'
0002 OP_CONSTANT  (01) '4.000000'
0004 OP_DIVIDE
0005 OP_CONSTANT  (02) '1.000000'
0007 OP_CONSTANT  (00) '2.000000'
0009 OP_DIVIDE
0010 OP_ADD
0011 OP_RETURN
Now if you've made it this far you'll be eager to finally connect everything
together by executing this bytecode with the virtual machine.
End to end
All the pieces slot together rather easily at this point, create a new
file targetcalc.py and define our
entry point:
from rpython.rlib import rfile
from compiler import Compiler
from vm import VM

LINE_BUFFER_LENGTH = 4096


def entry_point(argv):
    stdin, stdout, stderr = rfile.create_stdio()
    vm = VM()
    try:
        while True:
            stdout.write("> ")
            source = stdin.readline(LINE_BUFFER_LENGTH)
            if source:
                compiler = Compiler(source, debugging=False)
                compiler.compile()
                vm.interpret_chunk(compiler.chunk)
    except:
        pass
    return 0


def target(driver, *args):
    driver.exe_name = "calc"
    return entry_point, None
Let's try catch it out with a double negative:
$ ./calc
> 2--3
== VM TRACE ==
          []
0000 OP_CONSTANT  (00) '2.000000'
          [ 2.000000 ]
0002 OP_CONSTANT  (01) '3.000000'
          [ 2.000000 ] [ 3.000000 ]
0004 OP_NEGATE
          [ 2.000000 ] [ -3.000000 ]
0005 OP_SUBTRACT
          [ 5.000000 ]
0006 OP_RETURN
5.000000
Ok well let's evaluate the first 50 terms of the
Nilakantha Series:
$ ./calc
> 3 + 4 * ((1/(2 * 3 * 4)) + (1/(4 * 5 * 6)) - (1/(6 * 7 * 8)) + (1/(8 * 9 * 10)) - (1/(10 * 11 * 12)) + (1/(12 * 13 * 14)) - (1/(14 * 15 * 16)) + (1/(16 * 17 * 18)) - (1/(18 * 19 * 20)) + (1/(20 * 21 * 22)) - (1/(22 * 23 * 24)) + (1/(24 * 25 * 26)) - (1/(26 * 27 * 28)) + (1/(28 * 29 * 30)) - (1/(30 * 31 * 32)) + (1/(32 * 33 * 34)) - (1/(34 * 35 * 36)) + (1/(36 * 37 * 38)) - (1/(38 * 39 * 40)) + (1/(40 * 41 * 42)) - (1/(42 * 43 * 44)) + (1/(44 * 45 * 46)) - (1/(46 * 47 * 48)) + (1/(48 * 49 * 50)) - (1/(50 * 51 * 52)) + (1/(52 * 53 * 54)) - (1/(54 * 55 * 56)) + (1/(56 * 57 * 58)) - (1/(58 * 59 * 60)) + (1/(60 * 61 * 62)) - (1/(62 * 63 * 64)) + (1/(64 * 65 * 66)) - (1/(66 * 67 * 68)) + (1/(68 * 69 * 70)) - (1/(70 * 71 * 72)) + (1/(72 * 73 * 74)) - (1/(74 * 75 * 76)) + (1/(76 * 77 * 78)) - (1/(78 * 79 * 80)) + (1/(80 * 81 * 82)) - (1/(82 * 83 * 84)) + (1/(84 * 85 * 86)) - (1/(86 * 87 * 88)) + (1/(88 * 89 * 90)) - (1/(90 * 91 * 92)) + (1/(92 * 93 * 94)) - (1/(94 * 95 * 96)) + (1/(96 * 97 * 98)) - (1/(98 * 99 * 100)) + (1/(100 * 101 * 102)))

== VM TRACE ==
          []
0000 OP_CONSTANT  (00) '3.000000'
          [ 3.000000 ]
0002 OP_CONSTANT  (01) '4.000000'
...SNIP...
0598 OP_CONSTANT  (101) '102.000000'
          [ 3.000000 ] [ 4.000000 ] [ 0.047935 ] [ 1.000000 ] [ 10100.000000 ] [ 102.000000 ]
0600 OP_MULTIPLY
          [ 3.000000 ] [ 4.000000 ] [ 0.047935 ] [ 1.000000 ] [ 1030200.000000 ]
0601 OP_DIVIDE
          [ 3.000000 ] [ 4.000000 ] [ 0.047935 ] [ 0.000001 ]
0602 OP_ADD
          [ 3.000000 ] [ 4.000000 ] [ 0.047936 ]
0603 OP_MULTIPLY
          [ 3.000000 ] [ 0.191743 ]
0604 OP_ADD
          [ 3.191743 ]
0605 OP_RETURN
3.191743
We just executed 605 virtual machine instructions to compute pi to 1dp!
This brings us to the end of this tutorial. To recap we've walked through the whole
compilation process: from the user providing an expression string on the REPL, scanning
the source string into tokens, parsing the tokens while accounting for relative
precedence via a Pratt parser, generating bytecode, and finally executing the bytecode
on our own VM. RPython translated what we wrote into C and compiled it, meaning
our resulting calc REPL is really fast.
“The world is a thing of utter inordinate complexity and richness and strangeness that is absolutely awesome.”
― Douglas Adams
Many thanks to Bob Nystrom for writing the book that inspired this post, and thanks to
Carl Friedrich and Matt Halverson for reviewing.
― Brian (@thorneynzb)

